

Placemat Commission: Every Shade of Blue
Click here to learn more about Sarah Atlee’s custom-made quilts. Book your Customization Call today and we’ll get started!
It Starts With Your Story
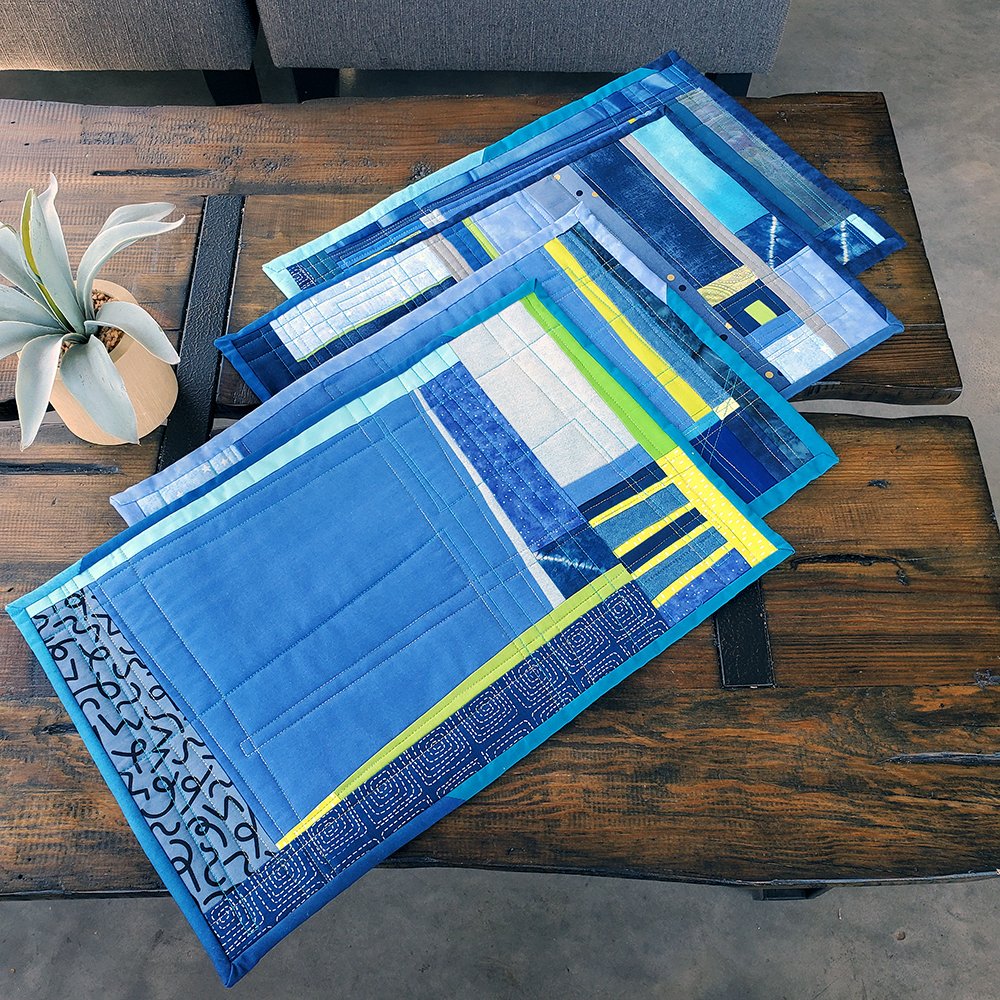
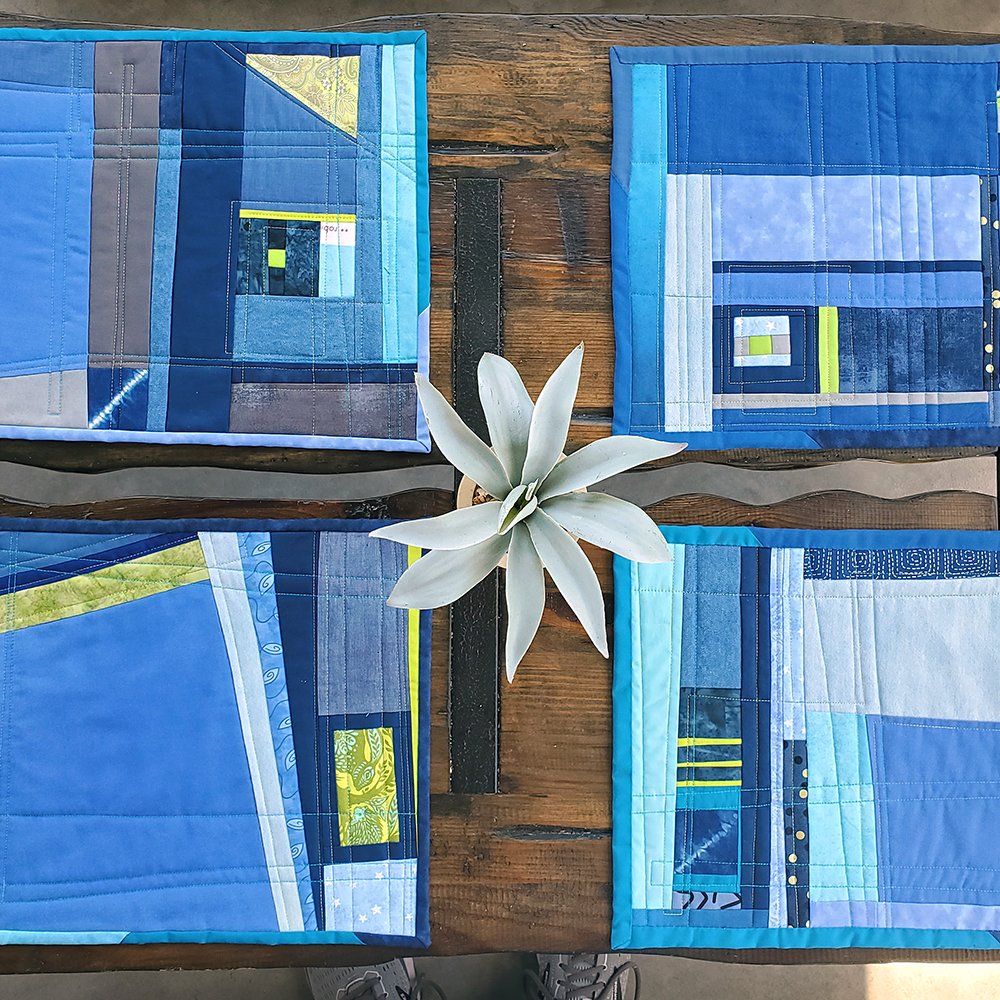
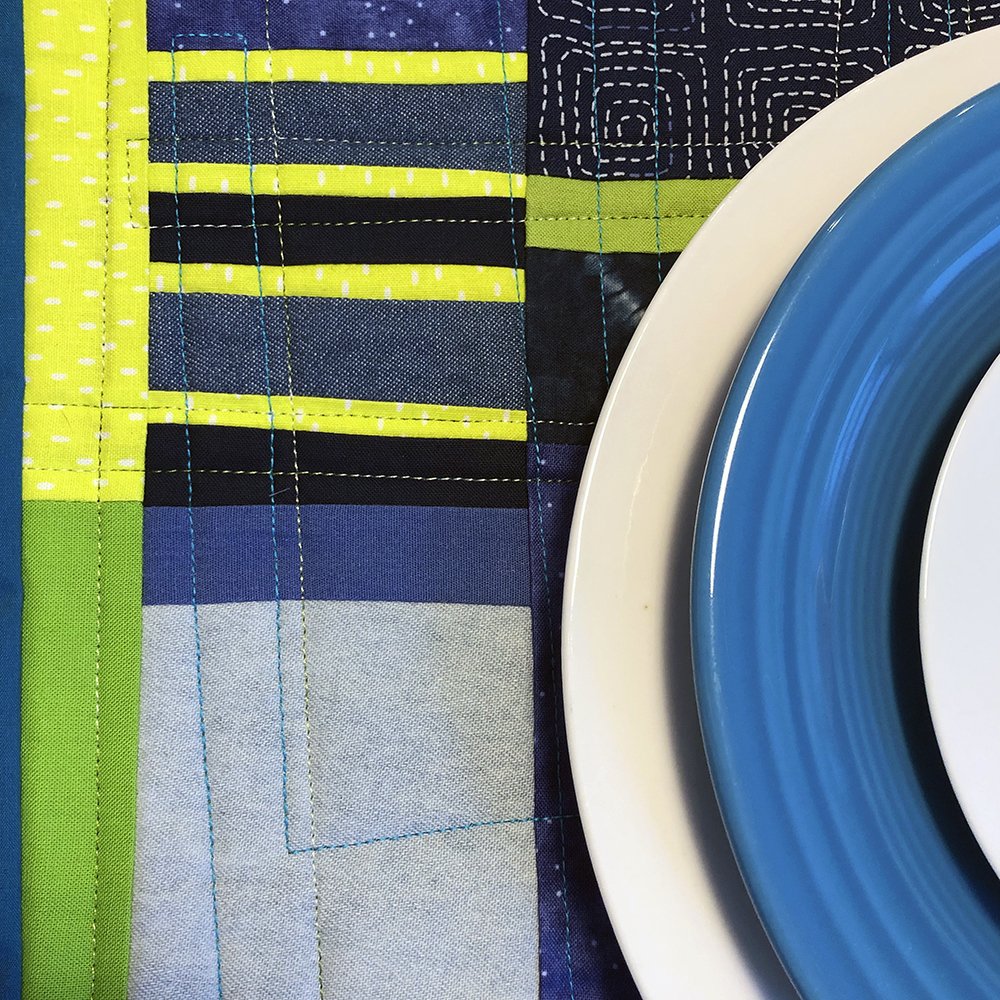
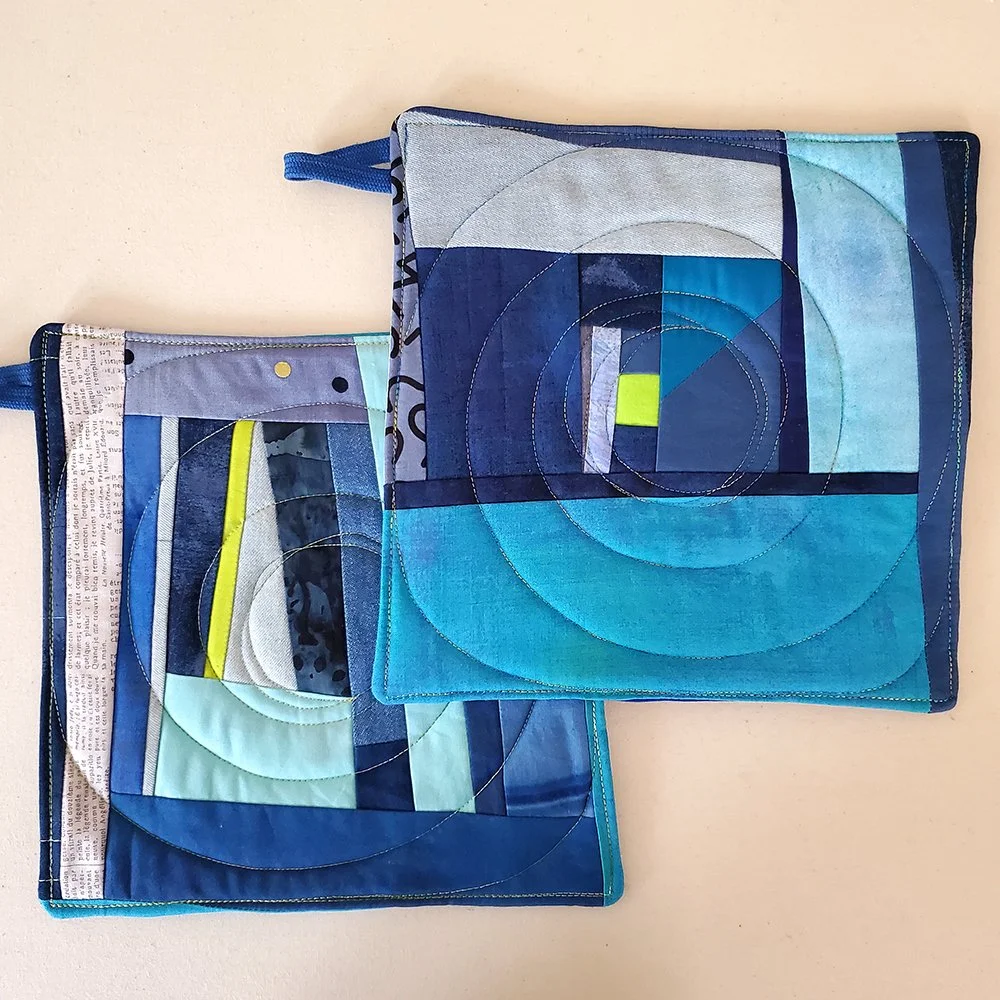
As always, this commission started with a conversation. My client was looking for new placemats to brighten up their dinner table. They requested lots of different shades of blue, with little pops of lime green.

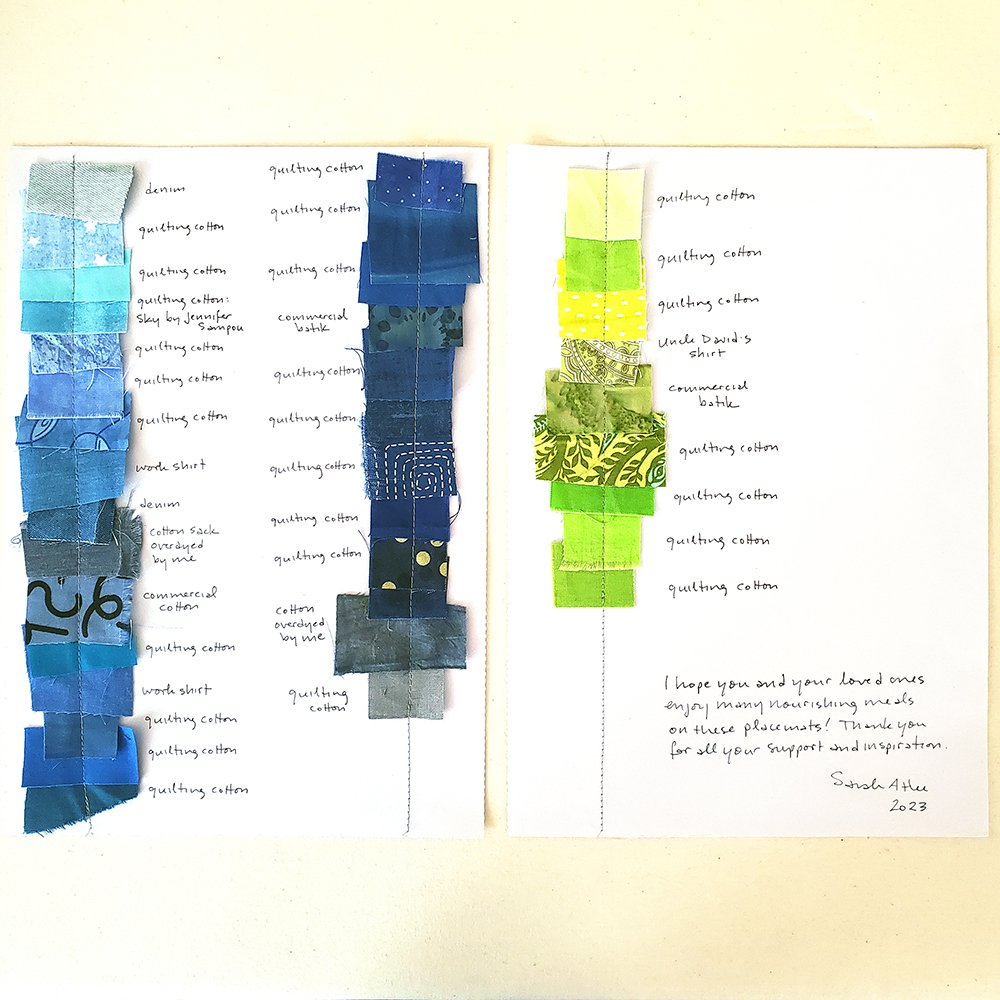
This was the perfect opportunity to use some mini charm squares* that I'd overdyed with indigo.
* for non-quilter people: "charm square" refers to a common size of pre-cut fabric. See also jelly roll, layer cake, charm pack, and quilters' candies. Yes, we're a wild and whimsical bunch. [eyeroll]
I'd also been contemplating a pre-loved work shirt in chambray blue. I like to think that placemats would be a sweet retirement gig for a hard-working garment.

We started out with an order for 8 placemats. However, my client made an unforeseen move to a much smaller house, so we revised that to 4. (Really, though, it's 4 fronts and 4 backs, so kinda like 8.)

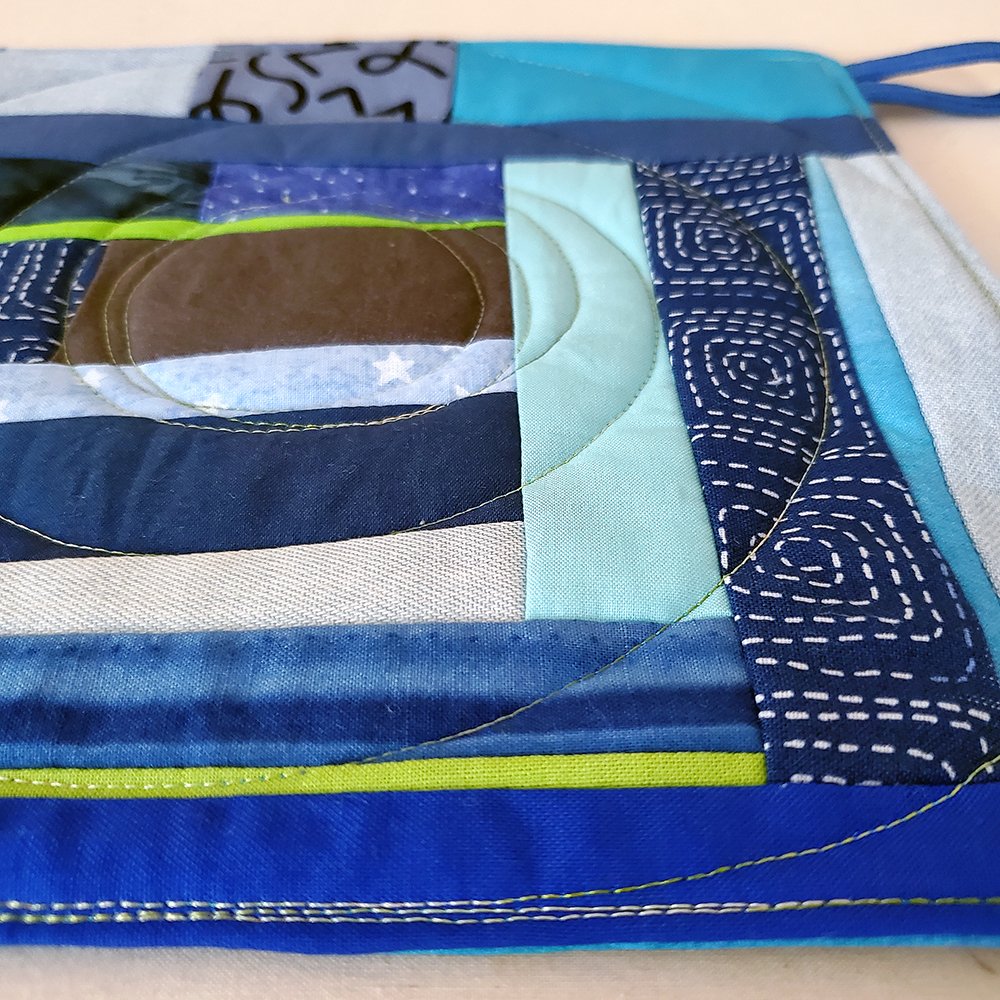
I constructed these using quilt-as-you-go techniques. This basically means that I sewed each piece of fabric directly to the batting (that fluffy middle layer). I also use this method to make potholders.
And yes, these are improv quilts! I started with a general plan and a palette, but no specific designs or measurements. Each composition evolved during the process.


I just happened to put the finishing touches on these while hanging out at my favorite coffee shop. Since it wasn't crowded, I took the opportunity to photograph these among the convenient sunbeams and actual grownup furniture.


AND, my client (a fellow artist) was kind enough to take some pictures in situ.

More Than Just A Quilt
If you're thinking about commissioning a custom quilt, here's something you should know: As part of your package, I will include swatches of all the fabrics I use in your quilt, with notes about their origin.
You'll also get a pair of custom potholders made from the scraps. You're welcome to keep them for yourself, or pass them on as a gift!
Elevate Your Space
What extra-special touch is missing from your home? Bed covers, couch blankies, potholders, table runners, placemats, mug mats, coasters -- these are all right in my wheelhouse. Let's talk about bringing some magic into your space.
Home Is Where the Art Is

Home. It's a nebulous concept, one that's been on my mind a lot lately. These mini quilts are an expression of longing, rootlessness - perhaps "home" is a part of us that we always carry, though it may drift to the bottom with the kleenex and loose change.
[The Home quilts were created for my top-tier Patreon patrons in 2016. I closed my Patreon page in 2022.]
Following is a more detailed look at the quilt construction process:

Notes on construction, quilting patterns.

Drawing a general outline onto the batting.

Sewing the pieces directly onto the batting, as part of a quilt-as-you-go technique.
The first one with all three layers (top, batting backing) assembled and quilted.

Quilting lines look so cool on the back.

Moving down the assembly line...

Finished blocks, photographed on a convenient hedge.

Quilting creates such wonderful textures.

More stitches. I'm not a fan of stitch-in-the-ditch, but I love getting right up toward those ditches.
home-blocks-closeup-3-500
Hand-finished binding, always perfectly imperfect.
Save
Preparing a Canvas for Acrylic Painting
 I work almost exclusively in acrylic on canvas. For larger works I use unstretched canvas hanging it over a dowel rod, much the same way you would display a quilt or tapestry.
But for my smaller works I use Blick Gallery Profile pre-stretched canvases.
Side note: Everyone who's been through art school has learned to build their own stretched canvases. I used to. Now it's more economical for me in terms of time and labor to order pre-made canvases in batches of 4-8. Want to learn to build canvases yourself? YouTube's got you covered.

Why Bother?
When someone buys my painting and takes it home, I want them to know that they have purchased a quality product that will last for decades to come - not something shabby that will fall apart in a year. The value of my work is more than the paint I've put on the canvas; it's in the care I've taken to ensure that my collectors enjoy living with my art. Prepping a canvas before painting is just one way to demonstrate that I care about my client's experience.
The preparatory process also prevents small problems that, added up, can really interfere with the final product.
Step 1: Corners

I buy these Blick canvases because they are very well-constructed. However, the corners do tend to come loose, and sometimes the canvas has been trimmed unevenly. (Not true of hand-built canvases; see note above re: economy.)
See those flappy edges? Even if I paint over them those are still weak spots that will get worse as the painting ages. I want to nip that in the bud.
I glue down those corners with Golden Heavy Gel.
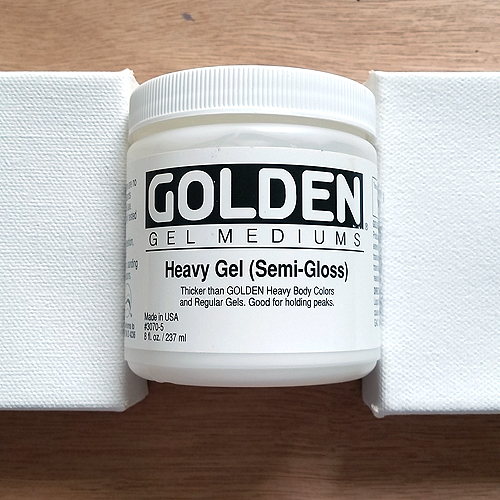
I apply the gel undiluted to the corners of the canvas, both on the sides and the back, and press those flaps down hard. Any gel that squishes out gets smeared over the raw edges to seal them. It doesn't matter how much gel ends up being visible because I'm going to paint over the entire thing. I let them dry about 30 minutes.

Step 2: Sizing the Back
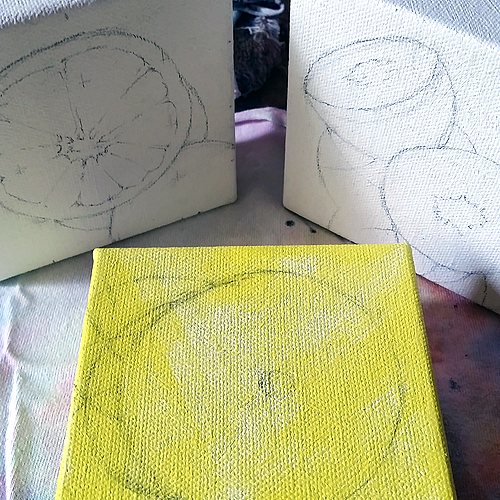
The canvases you see pictured here are very small - 4x4" each. This next step is much more important for larger canvases.
In most cases, a pre-stretched canvas will be primed on the front side only. Priming the other side strengthens the canvas and helps ensure its longevity. Also, the tighter your stretched canvas, the less likely you are to bump against the underlying stretchers while painting.
With a stiff brush, I wet down the back of the canvas. I make sure to get that water as far under the stretchers as possible. On a larger canvas, I follow up with diluted gesso. I brush both vertically and horizontally to work the water and gesso into the weave of the canvas. You'll notice right away that the canvas gets tighter. It will loosen a little after drying, but will be stronger for the additional gesso.
Step 3: Gesso Coat
I buy canvases pre-primed, but I like to add an additional thin coat of gesso to front and back before painting. The manufacturer's acrylic primer can sometimes resist initial paint application, causing the paint to bead up on the surface. Gesso is chalkier and will soak that first coat of paint right up.

Or maybe a super-fun and interesting thicker coat.

A little sanding may be in order on your stretchers. Nobody likes splinters, right?
Step 4: Rock Out
Now she's ready to go.
The Finished Product
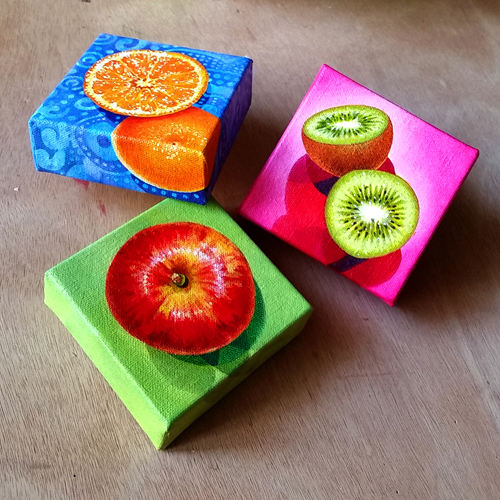
Orange, Kiwi and Apple. Acrylic on canvas, 4x4" each, 2014 by Sarah Atlee Private commission
What are your tips for prepping before painting?
Let us know in the comments below.
Sketchbook 2012: No Trespassing Quilt

Sketchbook 2012: No Trespassing, mixed media, 2012 by Sarah Atle
No Trespassing, mixed media collage sketch, 2012 by Sarah Atlee
Like the Millennium Quilt series, I made this drawing while my mother was recovering from surgery. I thought it would be interesting to create a geometric composition based on a (blurry) photograph. Abstraction through pixellation, although the original photograph is the digital media, whereas the drawing below is analog.
Fijian, jiving, and scheme are cool words.

Sketchbook 2012: No Trespassing quilt sketch, ink and colored pe
No Trespassing Quilt, ink and colored pencil on paper, 2012 by Sarah Atlee